
I often use virtual machines for various tasks: from building software packages to testing software products or PoCs for vulnerabilities. Creating a virtual machine in Oracle VirtualBox is a time-consuming and annoying process: set parameters of VM, attach iso, make dozens of clicks in OS installation GUI interface, wait until everything is installed, configure network and install guest additions.
Of course you can create an image of the base machine once and clone it each time you need it. But from time to time you will still need to recreate this image, for example for a new Linux release. It would be much easier, if we could get a fresh and clean Virtual Machine that meets our requirements and with minimal effort. And this is what Vagrant by HashiCorp does.
Installation
Installation is trivial. Vagrant is available in all main Linux distributions and requires ~200 MB for install with all dependencies.
# apt-get install vagrant
Man page
Available commands:
# vagrant -h
Usage: vagrant [options] Creating Ubuntu VM
Then we go to some directory and create a Vagrantfile. To do it we need to know the name of Vagrant Box. You can search them at https://app.vagrantup.com/boxes/search:
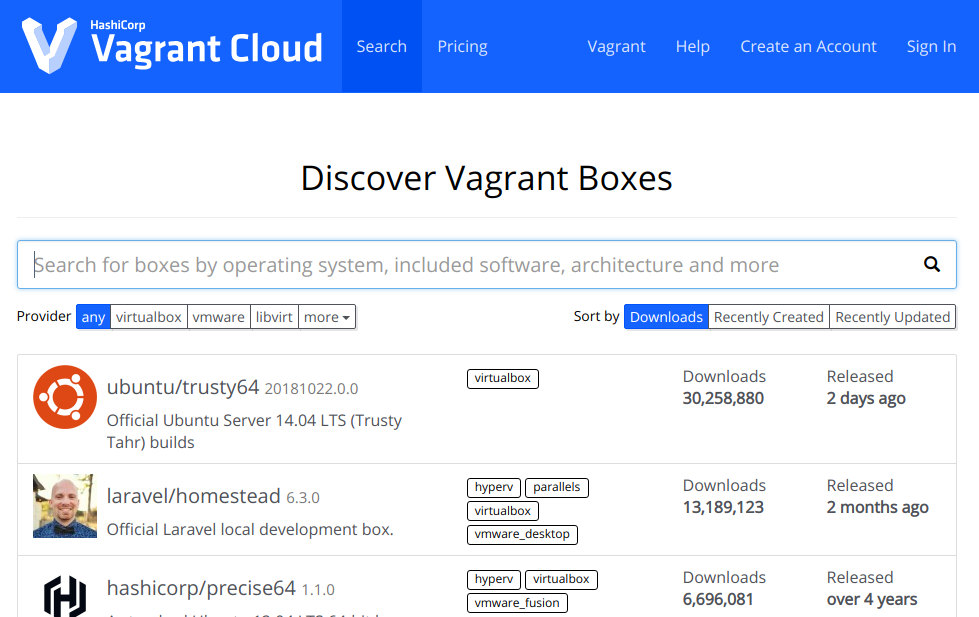
So, let’s try most popular init ubuntu/trusty64:
$ vagrant init ubuntu/trusty64
A `Vagrantfile` has been placed in this directory. You are now
ready to `vagrant up` your first virtual environment! Please read
the comments in the Vagrantfile as well as documentation on
`vagrantup.com` for more information on using Vagrant
Without comments and empty strings default Vagrantfile config is pretty small:
cat Vagrantfile | grep -v "#" | grep -v "^$"
Vagrant.configure("2") do |config|
  config.vm.box = "ubuntu/trusty64"
end
We can add more settings here, for example add second interface for internal network.
Then just launch`vagrant up` command and the magic starts:
$ vagrant up
Bringing machine 'default' up with 'virtualbox' provider...
==> default: Box 'ubuntu/trusty64' could not be found. Attempting to find and install...
default: Box Provider: virtualbox
default: Box Version: >= 0
==> default: Loading metadata for box 'ubuntu/trusty64'
default: URL: https://vagrantcloud.com/ubuntu/trusty64
==> default: Adding box 'ubuntu/trusty64' (v20181022.0.0) for provider: virtualbox
default: Downloading: https://vagrantcloud.com/ubuntu/boxes/trusty64/versions/20181022.0.0/providers/virtualbox.box
==> default: Successfully added box 'ubuntu/trusty64' (v20181022.0.0) for 'virtualbox'!
==> default: Importing base box 'ubuntu/trusty64'...
==> default: Matching MAC address for NAT networking...
==> default: Checking if box 'ubuntu/trusty64' is up to date...
==> default: Setting the name of the VM: vagrant_default_1540667310624_9586
==> default: Clearing any previously set forwarded ports...
Vagrant is currently configured to create VirtualBox synced folders with
the `SharedFoldersEnableSymlinksCreate` option enabled. If the Vagrant
guest is not trusted, you may want to disable this option. For more
information on this option, please refer to the VirtualBox manual:
https://www.virtualbox.org/manual/ch04.html#sharedfolders
This option can be disabled globally with an environment variable:
VAGRANT_DISABLE_VBOXSYMLINKCREATE=1
or on a per folder basis within the Vagrantfile:
config.vm.synced_folder '/host/path', '/guest/path', SharedFoldersEnableSymlinksCreate: false
==> default: Clearing any previously set network interfaces...
==> default: Preparing network interfaces based on configuration...
default: Adapter 1: nat
==> default: Forwarding ports...
default: 22 (guest) => 2222 (host) (adapter 1)
==> default: Booting VM...
==> default: Waiting for machine to boot. This may take a few minutes...
default: SSH address: 127.0.0.1:2222
default: SSH username: vagrant
default: SSH auth method: private key
default: Warning: Connection reset. Retrying...
default: Warning: Remote connection disconnect. Retrying...
default: Warning: Connection reset. Retrying...
default: Warning: Remote connection disconnect. Retrying...
default: Warning: Connection reset. Retrying...
default: Warning: Remote connection disconnect. Retrying...
default:
default: Vagrant insecure key detected. Vagrant will automatically replace
default: this with a newly generated keypair for better security.
default:
default: Inserting generated public key within guest...
default: Removing insecure key from the guest if it's present...
default: Key inserted! Disconnecting and reconnecting using new SSH key...
==> default: Machine booted and ready!
==> default: Checking for guest additions in VM...
default: The guest additions on this VM do not match the installed version of
default: VirtualBox! In most cases this is fine, but in rare cases it can
default: prevent things such as shared folders from working properly. If you see
default: shared folder errors, please make sure the guest additions within the
default: virtual machine match the version of VirtualBox you have installed on
default: your host and reload your VM.
default:
default: Guest Additions Version: 4.3.36
default: VirtualBox Version: 5.2
==> default: Mounting shared folders...
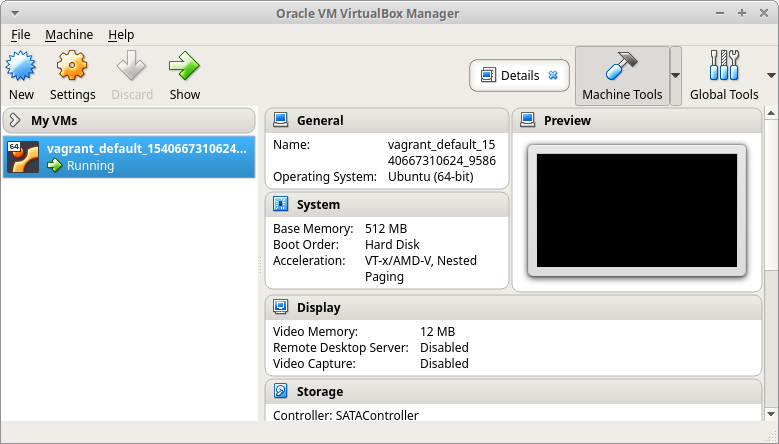
default: /vagrant => /home/alexander/vagrantIt really creates a new running virtual machine in VirtualBox:
With just one command we can get ssh access to the host:
$ vagrant ssh
Welcome to Ubuntu 14.04.5 LTS (GNU/Linux 3.13.0-161-generic x86_64)

* Documentation: https://help.ubuntu.com/

System information disabled due to load higher than 1.0

Get cloud support with Ubuntu Advantage Cloud Guest:
http://www.ubuntu.com/business/services/cloud

0 packages can be updated.
0 updates are security updates.

New release '16.04.5 LTS' available.
Run 'do-release-upgrade' to upgrade to it.

vagrant@vagrant-ubuntu-trusty-64:~$ sudo su
root@vagrant-ubuntu-trusty-64:/home/vagrant#
And when we don’t need this virtual machine and ubuntu/trusty64 box we can easily delete them:
$ vagrant destroy
    default: Are you sure you want to destroy the 'default' VM? [y/N] y
==> default: Forcing shutdown of VM...
==> default: Destroying VM and associated drives...
$ vagrant box remove ubuntu/trusty64 -f
Removing box 'ubuntu/trusty64' (v20181022.0.0) with provider 'virtualbox'...
Vagrant-libvirt plugin removed box only from you LOCAL ~/.vagrant/boxes directory
From libvirt storage pool you have to delete image manually(virsh, virt-manager or by any other tool)
In conclusion
Vagrant is a very convenient tool for deploying virtual machines. It’s especially great for testing. However, it’s necessary to understand, that in fact Vagrant boxes are nothing more then images of virtual machines that were created by someone (not you). And, in theory, they may contain something malicious. So, it’s the question of trust. But, it’s possible to make own base boxes using the Packer tool made by the same HashiCorp.

Hi! My name is Alexander and I am a Vulnerability Management specialist. You can read more about me here. Currently, the best way to follow me is my Telegram channel @avleonovcom. I update it more often than this site. If you haven’t used Telegram yet, give it a try. It’s great. You can discuss my posts or ask questions at @avleonovchat.
А всех русскоязычных я приглашаю в ещё один телеграмм канал @avleonovrus, первым делом теперь пишу туда.
Pingback: Packabit project: building Nmap deb packages for Ubuntu | Alexander V. Leonov
Pingback: DPDK with OVS and Open Flow Installation: Getting Ready for User Space Switching in a Virtual Environment – SCU’s Internet of Things Research Lab