
upd. 29.09.2018 Unfortunately, the script does not work after Greenbone moved the sources from their internal repository to GitHub. It’s necessary to edit the script. Stay tuned.
In last month Greenbone Networks and OpenVAS development team have finally presented new OpenVAS 9 with new GUI, improved multi-scanner support, improved asset management, etc. We have been waiting for this release for 2 years!
Upd. Please note, that entire procedure for separating scanners onto separate hardware/distributed hardware in different datacenters has changed completely – and that it’s a good idea to get familiar with this new procedure prior to upgrading to OpenVAS 9. 😉
For installing OpenVAS 9 from the sources I used the same script as for OpenVAS 8 installation last year. More details about this script and why you may need it you can read in the post “openvas_commander for OpenVAS installation and management“.
I fixed the script a bit because of these changes in OpenVAS9:
- openvas-nvt-syncwas renamed to greenbone-nvt-sync
- openvas-mkcert and openvas-mkcert-client were replaced by openvas-manage-certs
For this installation I took latest version of Debian: http://cdimage.debian.org/debian-cd/current/i386/iso-cd/debian-8.7.1-i386-netinst.iso and created a VirtualBox virtual machine “OpenVAS 9”:
- 32-bit
- 1024 mb RAM
- 30 GB HDD
- NAT interface and host only network
During the OS installation, I made the following settings:
- Primary interface eth0 (NAT)
- Hostname openvas9
- Standard set of components + SSH Server
When Debian installation was finished, I, for some reason, had the same connection active used for two network interfaces (NAT and host only), and only one interface, NAT, really worked. With nmtui I made one more connection and for each connection I set particular interfaces: eth0 for one, eth1 for another. I also set static ip address 192.168.56.120 for the host.
ssh vmuser@192.168.56.120.

su -
Warning! When elevating privileges, use `su -` to avoid problems with the locale.
Ok, now we are ready to install OpenVAS9 on this host.
# wget https://raw.githubusercontent.com/leonov-av/openvas-commander/master/openvas_commander.sh

# chmod +x openvas_commander.sh
Install dependencies (the longest operation):
# ./openvas_commander.sh --install-dependencies
Available versions of OpenVAS:
# ./openvas_commander.sh --show-releases

OpenVAS-8

OpenVAS-9
Available source archives for OpenVAS 9:
# ./openvas_commander.sh --show-sources "OpenVAS-9"

http://wald.intevation.org/frs/download.php/2420/openvas-libraries-9.0.1.tar.gz

http://wald.intevation.org/frs/download.php/2423/openvas-scanner-5.1.1.tar.gz

http://wald.intevation.org/frs/download.php/2426/openvas-manager-7.0.1.tar.gz

http://wald.intevation.org/frs/download.php/2429/greenbone-security-assistant-7.0.2.tar.gz

http://wald.intevation.org/frs/download.php/2397/openvas-cli-1.4.5.tar.gz

http://wald.intevation.org/frs/download.php/2377/openvas-smb-1.0.2.tar.gz

http://wald.intevation.org/frs/download.php/2401/ospd-1.2.0.tar.gz

http://wald.intevation.org/frs/download.php/2405/ospd-debsecan-1.2b1.tar.gz
Download and unpack:
# ./openvas_commander.sh --download-sources "OpenVAS-9"

# ./openvas_commander.sh --create-folders
Everything is in place and we are ready for actual installation:
# ls openvas

greenbone-security-assistant-7.0.2 openvas-scanner-5.1.1

greenbone-security-assistant-7.0.2.tar.gz openvas-scanner-5.1.1.tar.gz

openvas-cli-1.4.5 openvas-smb-1.0.2

openvas-cli-1.4.5.tar.gz openvas-smb-1.0.2.tar.gz

openvas-libraries-9.0.1 ospd-1.2.0

openvas-libraries-9.0.1.tar.gz ospd-1.2.0.tar.gz

openvas-manager-7.0.1 ospd-debsecan-1.2b1

openvas-manager-7.0.1.tar.gz ospd-debsecan-1.2b1.tar.gz
Install the components:
# ./openvas_commander.sh --install-all
NB: If you are afraid that something might go wrong, you can start separately:
# ./openvas_commander.sh --install-component "openvas-smb"

# ./openvas_commander.sh --install-component "openvas-libraries"

# ./openvas_commander.sh --install-component "openvas-scanner"

# ./openvas_commander.sh --install-component "openvas-manager"

# ./openvas_commander.sh --install-component "openvas-cli"

# ./openvas_commander.sh --install-component "greenbone-security-assistant"
Create certificates and a user:
# ./openvas_commander.sh --configure-all
Update and rebuild content:
# ./openvas_commander.sh --update-content

# ./openvas_commander.sh --rebuild-content
Launch the OpenVAS processes:
# ./openvas_commander.sh --kill-all

# ./openvas_commander.sh --start-all
Check, that everything is started, wait for openvassd:
# ./openvas_commander.sh --check-proc

root 10404 15.5 7.2 142980 74724 pts/0 SL 18:17 0:00 openvasmd

root 10422 59.0 1.0 35424 11004 ? Rs 18:17 0:01 openvassd: Reloaded 14250 of 52652 NVTs (27% / ETA: 00:08)

root 10424 0.0 0.2 31536 2732 ? S 18:17 0:00 openvassd (Loading Handler)

root 10425 0.6 0.5 28452 6056 pts/0 Sl 18:17 0:00 /usr/local/sbin/gsad

root 10426 0.0 0.3 28452 3424 pts/0 Sl 18:17 0:00 /usr/local/sbin/gsad

root 10439 0.0 0.2 4556 2184 pts/0 S+ 18:17 0:00 grep -E (openvas.d|gsad)
n a few minutes all NVTs are reloaded:
# ./openvas_commander.sh --check-proc

root 10404 0.8 7.2 142980 74724 pts/0 SL 18:17 0:00 openvasmd

root 10422 8.2 1.0 35556 11132 ? Ss 18:17 0:05 openvassd: Waiting for incoming connections

root 10425 0.0 0.5 28452 6056 pts/0 Sl 18:17 0:00 /usr/local/sbin/gsad

root 10426 0.0 0.3 28452 3424 pts/0 Sl 18:17 0:00 /usr/local/sbin/gsad

root 10463 0.0 0.2 4556 2204 pts/0 S+ 18:19 0:00 grep -E (openvas.d|gsad)
If something goes wrong, you can always find out what to do next with:
# ./openvas_commander.sh --check-status v9
If everything is OK, the output of the command should be like this:
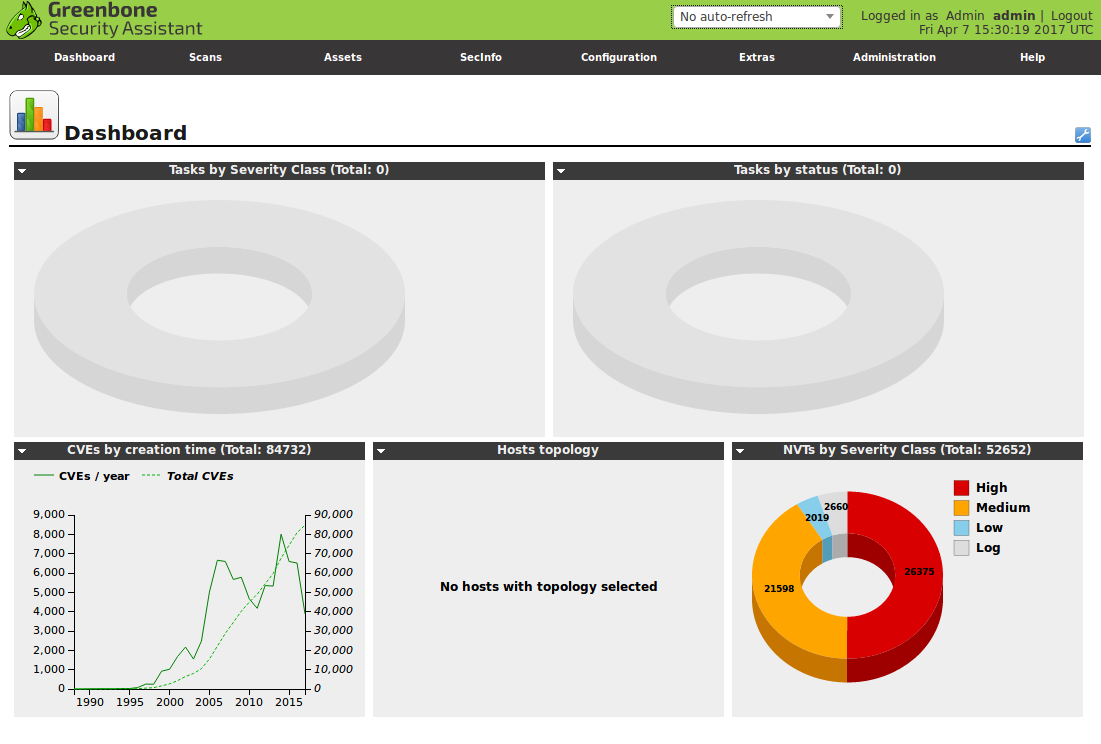
openvas-check-setup 2.3.7
Test completeness and readiness of OpenVAS-9

Please report us any non-detected problems and
help us to improve this check routine:
http://lists.wald.intevation.org/mailman/listinfo/openvas-discuss

Send us the log-file (/tmp/openvas-check-setup.log) to help analyze the problem.

Step 1: Checking OpenVAS Scanner ...
OK: OpenVAS Scanner is present in version 5.1.1.
OK: redis-server is present in version v=2.8.17.
OK: scanner (kb_location setting) is configured properly using the redis-server socket: /tmp/redis.sock
OK: redis-server is running and listening on socket: /tmp/redis.sock.
OK: redis-server configuration is OK and redis-server is running.
OK: NVT collection in /usr/local/var/lib/openvas/plugins contains 52652 NVTs.
WARNING: Signature checking of NVTs is not enabled in OpenVAS Scanner.
SUGGEST: Enable signature checking (see http://www.openvas.org/trusted-nvts.html).
OK: The NVT cache in /usr/local/var/cache/openvas contains 52652 files for 52652 NVTs.
Step 2: Checking OpenVAS Manager ...
OK: OpenVAS Manager is present in version 7.0.1.
OK: OpenVAS Manager database found in /usr/local/var/lib/openvas/mgr/tasks.db.
OK: Access rights for the OpenVAS Manager database are correct.
OK: sqlite3 found, extended checks of the OpenVAS Manager installation enabled.
OK: OpenVAS Manager database is at revision 184.
OK: OpenVAS Manager expects database at revision 184.
OK: Database schema is up to date.
OK: OpenVAS Manager database contains information about 52652 NVTs.
OK: At least one user exists.
OK: OpenVAS SCAP database found in /usr/local/var/lib/openvas/scap-data/scap.db.
OK: OpenVAS CERT database found in /usr/local/var/lib/openvas/cert-data/cert.db.
OK: xsltproc found.
Step 3: Checking user configuration ...
WARNING: Your password policy is empty.
SUGGEST: Edit the /usr/local/etc/openvas/pwpolicy.conf file to set a password policy.
Step 4: Checking Greenbone Security Assistant (GSA) ...
OK: Greenbone Security Assistant is present in version 7.0.2.
OK: Your OpenVAS certificate infrastructure passed validation.
Step 5: Checking OpenVAS CLI ...
SKIP: Skipping check for OpenVAS CLI.
Step 6: Checking Greenbone Security Desktop (GSD) ...
SKIP: Skipping check for Greenbone Security Desktop.
Step 7: Checking if OpenVAS services are up and running ...
OK: netstat found, extended checks of the OpenVAS services enabled.
OK: OpenVAS Scanner is running and listening on a Unix domain socket.
OK: OpenVAS Manager is running and listening on a Unix domain socket.
OK: Greenbone Security Assistant is listening on port 80, which is the default port.
Step 8: Checking nmap installation ...
WARNING: Your version of nmap is not fully supported: 6.47
SUGGEST: You should install nmap 5.51 if you plan to use the nmap NSE NVTs.
Step 10: Checking presence of optional tools ...
OK: pdflatex found.
OK: PDF generation successful. The PDF report format is likely to work.
OK: ssh-keygen found, LSC credential generation for GNU/Linux targets is likely to work.
OK: rpm found, LSC credential package generation for RPM based targets is likely to work.
OK: alien found, LSC credential package generation for DEB based targets is likely to work.
OK: nsis found, LSC credential package generation for Microsoft Windows targets is likely to work.

It seems like your OpenVAS-9 installation is OK.

If you think it is not OK, please report your observation
and help us to improve this check routine:
http://lists.wald.intevation.org/mailman/listinfo/openvas-discuss
Please attach the log-file (/tmp/openvas-check-setup.log) to help us analyze the problem.
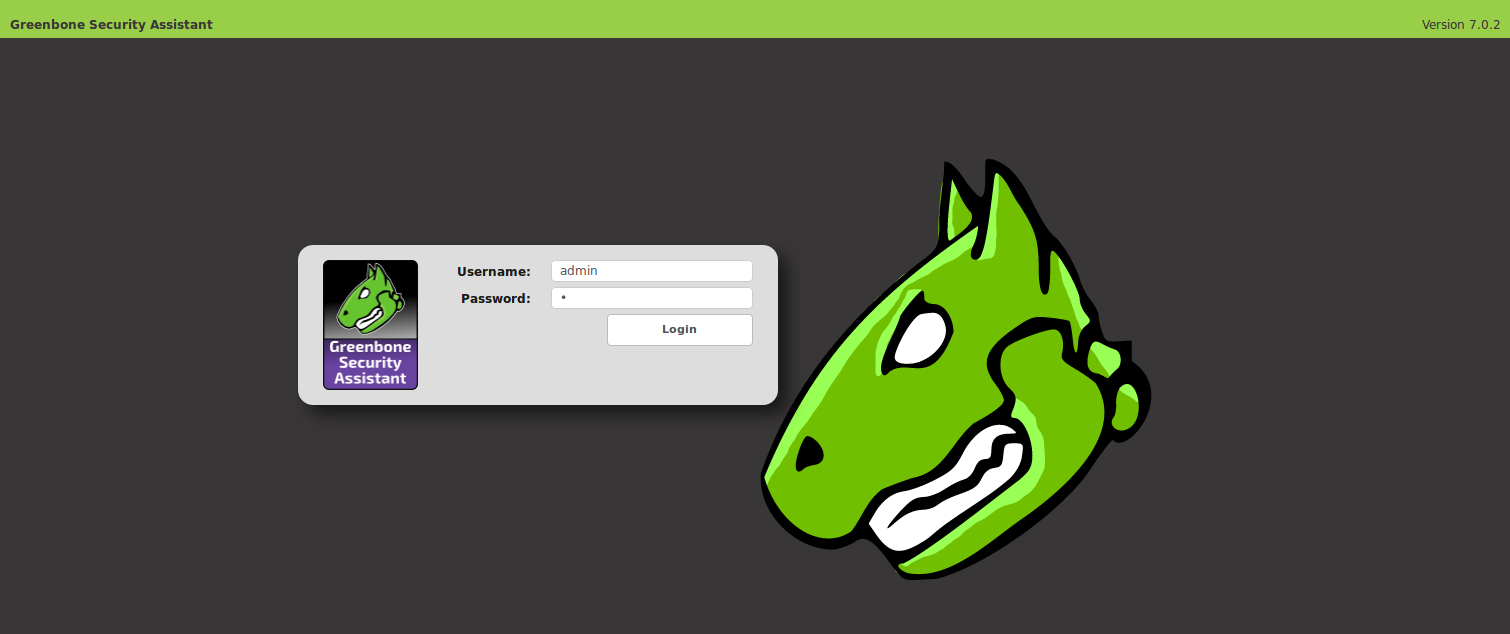
Now we can go to https://192.168.56.120 and here is the invitation for login. Default login and password: admin/1
In the case of debugging, OpenVAS logs are located here: /usr/local/var/log/openvas/

Hi! My name is Alexander and I am a Vulnerability Management specialist. You can read more about me here. Currently, the best way to follow me is my Telegram channel @avleonovcom. I update it more often than this site. If you haven’t used Telegram yet, give it a try. It’s great. You can discuss my posts or ask questions at @avleonovchat.
А всех русскоязычных я приглашаю в ещё один телеграмм канал @avleonovrus, первым делом теперь пишу туда.
Pingback: openvas_commander for OpenVAS installation and management | Alexander V. Leonov
Great post, and the script does wonders for installing.
It might be worth mentioning somewhere in the post that the entire procedure for separating scanners onto separate hardware/distributed hardware in different datacenters has changed completely – and that it’s a good idea to get familiar with this new procedure prior to upgrading to OpenVAS 9. 🙂
Hi Hans! Thanks for your kind words and great comment! I will add this note to the post. 🙂
Wonderful post describing the successful installation of the OpenVAS 9 from the sources. You can find more about it in detail here.
Pingback: WannaCry about Vulnerability Management | Alexander V. Leonov
I followed steps to install openvas9 but I got the following error:
/openvas_commander.sh –install-component “openvas-smb”
./openvas_commander.sh: line 65: cd: too many arguments
mkdir: cannot create directory ‘build’: File exists
CMake Error: The source directory “/usr/local/src/openvas” does not appear to contain CMakeLists.txt.
Specify –help for usage, or press the help button on the CMake GUI.
make: *** No targets specified and no makefile found. Stop.
make: *** No rule to make target ‘doc-full’. Stop.
checkinstall 1.6.2, Copyright 2009 Felipe Eduardo Sanchez Diaz Duran
This software is released under the GNU GPL.
The package documentation directory ./doc-pak does not exist.
Should I create a default set of package docs? [y]: y
Preparing package documentation…OK
*** No known documentation files were found. The new package
*** won’t include a documentation directory.
*****************************************
**** Debian package creation selected ***
*****************************************
This package will be built according to these values:
0 – Maintainer: [ openvas_commander ]
1 – Summary: [ Package created with checkinstall 1.6.2 ]
2 – Name: [ openvas-smb ]
3 – Version: [ 20170519 ]
4 – Release: [ 1 ]
5 – License: [ GPL ]
6 – Group: [ checkinstall ]
7 – Architecture: [ amd64 ]
8 – Source location: [ build ]
9 – Alternate source location: [ ]
10 – Requires: [ ]
11 – Provides: [ openvas-smb ]
12 – Conflicts: [ ]
13 – Replaces: [ ]
Enter a number to change any of them or press ENTER to continue:
Installing with make install…
========================= Installation results ===========================
make: *** No rule to make target ‘install’. Stop.
**** Installation failed. Aborting package creation.
Cleaning up…OK
Bye.
@Abd, you must remove the ‘*.tar.gz’ files before installing.:
rm openvas/*.tar.gz
Also, if using “stretch”, mingw32 package must be changed with mingw-w64
sed -i ‘s/mingw32/ming-w64/’ ./openvas_commander.sh
HI.
Just one small correction – you have forgot w in ming-w64
Command should be
sed -i ‘s/mingw32/mingw-w64/’ ./openvas_commander.sh
Or opne could replace ming by hand, it is on the begining of the script
not sure what I am doing wrong. I tried debian-8.7.1-amd64-netinst and debian-8.6.0-amd64-netinst
Does it have to be the i386 iso? Errors below
Package curl is not available, but is referred to by another package.
This may mean that the package is missing, has been obsoleted, or
is only available from another source
E: Package ‘curl’ has no installation candidate
root@OpenVas9:~# wget https://raw.githubusercontent.com/leonov-av/openvas-commander/master/openvas_commander.sh
–2017-06-15 16:03:58– https://raw.githubusercontent.com/leonov-av/openvas-commander/master/openvas_commander.sh
Resolving raw.githubusercontent.com (raw.githubusercontent.com)… 151.101.128.133, 151.101.192.133, 151.101.0.133, …
Connecting to raw.githubusercontent.com (raw.githubusercontent.com)|151.101.128.133|:443… connected.
HTTP request sent, awaiting response… 200 OK
Length: 6372 (6.2K) [text/plain]
Saving to: ‘openvas_commander.sh’
openvas_commander.s 100%[=====================>] 6.22K –.-KB/s in 0s
2017-06-15 16:03:58 (48.6 MB/s) – ‘openvas_commander.sh’ saved [6372/6372]
root@OpenVas9:~# chmod +x openvas_commander.sh
root@OpenVas9:~# clear
root@OpenVas9:~# ./openvas_commander.sh –install-dependencies
./openvas_commander.sh: line 19: curl: command not found
Reading package lists… Done
Building dependency tree
Reading state information… Done
Package pkg-config is not available, but is referred to by another package.
This may mean that the package is missing, has been obsoleted, or
is only available from another source
Package libpopt-dev is not available, but is referred to by another package.
This may mean that the package is missing, has been obsoleted, or
is only available from another source
Package rpm is not available, but is referred to by another package.
This may mean that the package is missing, has been obsoleted, or
is only available from another source
Package curl is not available, but is referred to by another package.
This may mean that the package is missing, has been obsoleted, or
is only available from another source
Package libglib2.0-dev is not available, but is referred to by another package.
This may mean that the package is missing, has been obsoleted, or
is only available from another source
However the following packages replace it:
libglib2.0-0
Package libpcre3-dev is not available, but is referred to by another package.
This may mean that the package is missing, has been obsoleted, or
is only available from another source
Package python-setuptools is not available, but is referred to by another package.
This may mean that the package is missing, has been obsoleted, or
is only available from another source
Package gnutls-bin is not available, but is referred to by another package.
This may mean that the package is missing, has been obsoleted, or
is only available from another source
Package libsnmp-dev is not available, but is referred to by another package.
This may mean that the package is missing, has been obsoleted, or
is only available from another source
However the following packages replace it:
libsnmp-base
E: Unable to locate package build-essential
E: Unable to locate package devscripts
E: Unable to locate package dpatch
E: Package ‘curl’ has no installation candidate
E: Unable to locate package libassuan-dev
E: Package ‘libglib2.0-dev’ has no installation candidate
E: Unable to locate package libgpgme11-dev
E: Package ‘libpcre3-dev’ has no installation candidate
E: Unable to locate package libpth-dev
E: Unable to locate package libwrap0-dev
E: Unable to locate package libgmp-dev
E: Unable to locate package libgmp3-dev
E: Unable to locate package libgpgme11-dev
E: Package ‘libpcre3-dev’ has no installation candidate
E: Unable to locate package libpth-dev
E: Unable to locate package quilt
E: Unable to locate package cmake
E: Package ‘pkg-config’ has no installation candidate
E: Unable to locate package libssh-dev
E: Package ‘libglib2.0-dev’ has no installation candidate
E: Unable to locate package libpcap-dev
E: Unable to locate package libgpgme11-dev
E: Unable to locate package uuid-dev
E: Unable to locate package bison
E: Unable to locate package libksba-dev
E: Unable to locate package doxygen
E: Unable to locate package sqlfairy
E: Unable to locate package xmltoman
E: Unable to locate package sqlite3
E: Unable to locate package libsqlite3-dev
E: Unable to locate package redis-server
E: Unable to locate package libhiredis-dev
E: Package ‘libsnmp-dev’ has no installation candidate
E: Unable to locate package libmicrohttpd-dev
E: Unable to locate package libxml2-dev
E: Unable to locate package libxslt1-dev
E: Unable to locate package xsltproc
E: Unable to locate package libssh2-1-dev
E: Unable to locate package libldap2-dev
E: Unable to locate package autoconf
E: Unable to locate package nmap
E: Unable to locate package libgnutls28-dev
E: Package ‘gnutls-bin’ has no installation candidate
E: Package ‘libpopt-dev’ has no installation candidate
E: Unable to locate package heimdal-dev
E: Unable to locate package heimdal-multidev
E: Package ‘libpopt-dev’ has no installation candidate
E: Unable to locate package mingw32
E: Unable to locate package texlive-full
E: Package ‘rpm’ has no installation candidate
E: Unable to locate package alien
E: Unable to locate package nsis
E: Unable to locate package rsync
E: Package ‘python-setuptools’ has no installation candidate
E: Unable to locate package checkinstall
root@OpenVas9:~#
Hi GMF! Yes, I have tested it only with i386 Debian ISOs.
It seems that you don’t have curl on your machine. Please install it and try again.
Yea, I noticed that. I added curl and tried again and got most of the errors. I am going to try the i386 ISO now.
actually i have the install rolling now on debian-8.7.1-amd64-netinst
I installed curl_7.38.0-4+deb8u5_amd64.deb but ran your script again and then noticed that there was a need for an apt-get -f install to add another dependencie libcurl
we will see how it goes. Nice work by the way!
Pingback: GSM Community Edition and lagging OpenVAS Plugin Feed | Alexander V. Leonov
Hello!
Thank you for your guide and the script! Was really useful to speed up the OpenVAS’ upgrade on a Raspbian system.
Changes I made to the command order:
– Modified the default configuration of redis. Need to change the port to 0 to force unix socket and the sock permissions to 755 Otherwise I was unable to start redis and openvas services.
– Before the rebuild issued the start command.
– Thanks to the comments in the post, I modified the create_folders() function adding at the end after the “cd ../” command “find . -name “*.gz” -exec rm -fv {} \;” to clean downloaded packages.
Nice work!
Hello!
Thank you for your great guide.
Currently, the openvas manager and the openvas scanner are listening on a unix socket. I didn’t find any conf files enabling me to change this behaviour. Is it possible to listen on a TCP socket (9390 for example) ?
Bye
Hi Sr Alexander V. Leonov, thanks for your excelent guide!
I follow the instructions from your website but when start the task wizard, I have this error:
openvas 9 operation: start task status code: 503 status message: service temporarily down
Can help me please?
I need help. I had an Openvas 7.0.2 and I need the version 9. How can Update the version? Thanks…
Greetings!
Maybe you can help me with Windows Failed Authentication (credentialed scans)
On OpenVAS 6 the credentialed scans worked very well but now it appears like there are some error with SMB protocol when the scanner tryes to authenticate. We patched the targets with ms17-010 and dont know if thats the problem.
There are no enough information on OpenVAS offcial page and mabe yuo have some hints about this problem.
Thanks a lot for the tutorial.
I have a problem with this, when I run ./openvas_commander.sh –show-releases the script doesn’t return response. The dependencies it’s correctly installed. I don’t know why? Can you help me? (I’m sorry for my bad English)
Regards.
even i have the same error. but do anyone have solution for this?.
Pingback: Scaner-VS: Vulnerability Management solution for Russian Military | Alexander V. Leonov
Why there is no hostname in my scan?
Asset > Host
Thanks in advance.
Pingback: Vulners NASL Plugin Feeds for OpenVAS 9 | Alexander V. Leonov
Very nice tutorial.
I have managed to install OpenVAS easily.
I just want to know, is it possible to customize the theme, login page etc.
If yes, how do I put my company logo in the initial login page?
Regards
Ravi
plss step by step how to fix them
Hi,
If you have problems with installation, I recommend to use latest version of Kali Linux VM and then starting up OpenVas is as simple as:
#apt install openvas
#openvas-setup
#openvas-feed-update
#openvas-start
It’s all
hello, sorry, but we look forward to the script update 🙂
Hi Mathias, I hope I will do something in this direction as a part of Packabit project. Installing OpenVAS from sources is too time consuming and unreliable. I think we, as a part of OpenVAS community ;-), should make constant and independent process of building the packages at least for Deabin.