
How to make Email Bot service in Python. First of all, why you may want to use such service? Despite the fact that currently there are so many different channels of communication (including various messaging apps), Email is still a default and universal way to do it.
- Literally every enterprise service supports email notifications, even if it’s integration capabilities are rather limited. So, with Email Bot you can automatically process such notifications.
- Email is good, simple, reliable and familiar way to communicate with humans. Send an email – get response. Everyone can do it. So, email bot can make basic routine operations, like organizing the external meetings, pretty much like a human secretary.
- It’s easier to code Email bot than any other interface, and the code can be reused for other communication channels, for example messaging apps.
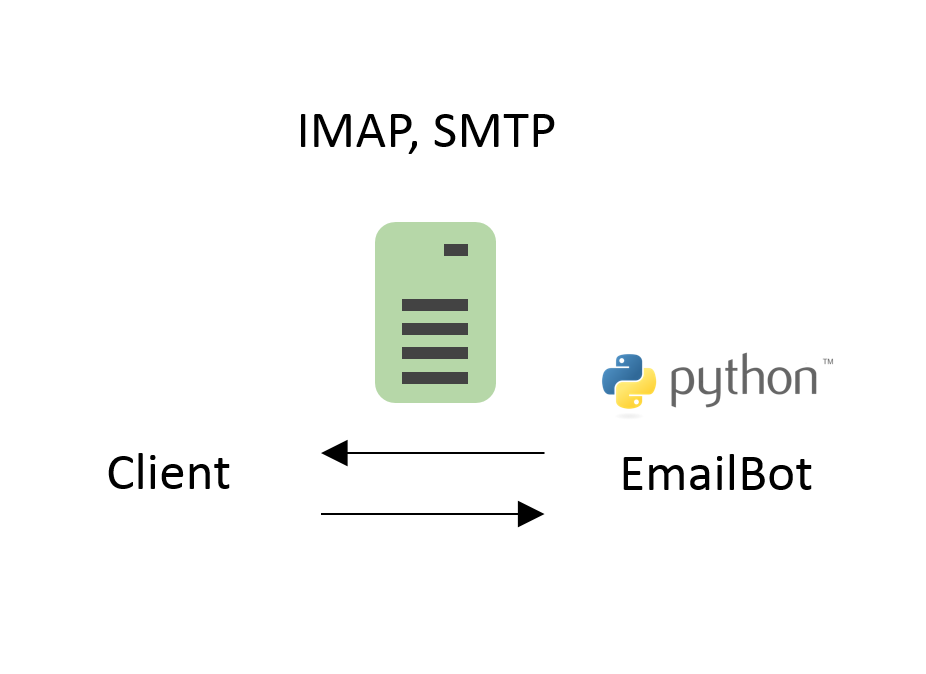
I get email messages from IMAP server in python3 using easyimap module.
It is very simple to use. You make a connection to the server, get the IDs of the messages and can retrieve MailObject by ID. Description of MailObject is here. Here is a separate post about sending and receiving email message in Python. Look there for details. The only useful thing that easyimap can’t do is to delete messages. You know, the mailbox can overflow. You can get the code for deleting from this stackoverflow topic.
IMAP Server
I’m receiving emails from IMAP server. IMAP uses port 143 and SSL/TLS encrypted IMAP uses port 993. So, if you connect to the server using telnet, you should see some like this:
$ telnet imap.corporation.com 143
Trying 10.10.117.18...
Connected to imap.corporation.com.
Escape character is '^]'.
* OK The Microsoft Exchange IMAP4 service is ready.
Email Bot
First of all, I create an empty json file for processed messages: ‘{}’. Then I analyze latest 100 email messages searching for one that starts with the command “IMPORTANT COMMAND”. When I find it, I send back “Hello!” with the citation of original message and save mail_id to processed messages dict (and file) to skip it on next iteration. And all this in cycle with 5 seconds sleep:
import html2text
import easyimap
import re
import json
import time

login = "tech_account"
password = "Password123"
imapper = easyimap.connect('imap.corporation.com', login, password)

f = open("messages.json")
processed_messages = json.loads(f.read())
f.close()

while True:
    print("searching for command...")
    for mail_id in imapper.listids(limit=100):
        mail = imapper.mail(mail_id)
        body = html2text.html2text(mail.body)
        if re.findall("^IMPORTANT COMMAND", body) \
                and str(mail_id) not in processed_messages:
            subject = mail.title

            message = "Hello!"

            citation = u"> From: " + mail.from_addr + '\n'
            citation += u"> Date: " + mail.date + '\n'
            citation += u"> Body: " + html2text.html2text(mail.body)

            send_email([str(mail.from_addr)], subject, message + "\n\n" + citation)

            processed_messages[str(mail_id)] = {'subject':subject, 'message':message, 'ts':int(time.time())}
            f = open("messages.json","w")
            f.write(json.dumps(processed_messages))
            f.close()
            print(str(mail_id) + " processed!")
    time.sleep(5)
So that actually it, a very simple email bot. Instead of replying with “Hello” each time, you can send any results of request processing. Here is a send_email function, that I use for sending emails via SMTP server:
import smtplib
from email.mime.multipart import MIMEMultipart
from email.mime.text import MIMEText

def send_email(receivers, subject, text):
    sender = login + '@corporation.com'

    msg = MIMEMultipart()
    msg['From'] = sender
    msg['To'] = ", ".join(receivers)
    msg['Subject'] = subject

    msg.attach(MIMEText(text))

    smtpObj = smtplib.SMTP('smtp.corporation.com:25')
    try:
        smtpObj.login(login, password)
    except:
        print("Login attempt failed")
    smtpObj.sendmail(sender, receivers, msg.as_string())
    print("SENT: " + msg.as_string())
Service
The last part is to make Email bot start at the boot of Operating System and restart on crash. This can be done in various ways. For example, you can write and schedule in cron a Bash script that will check whether the process is currently running and, if it’s not, will launch it.
But there is a much better option. You can create a systemd service. In this case, the Operating System will monitor status of the python script and restart it when it’s necessary. You just need to create a text file and set there the working directory and a path to the script:
# cat /etc/systemd/system/emailbot.service
[Unit]
Description=STerraBot service
After=network.target
StartLimitInterval=0
[Service]
Type=simple
Restart=always
RestartSec=1
User=j.smith
WorkingDirectory=/home/j.smith/EmailBot
ExecStart=/home/j.smith/EmailBot/run_email_bot.py

[Install]
WantedBy=multi-user.target
Note: I used old parameter StartLimitInterval, because new parameter StartLimitIntervalSec leads to an error in CentOS 7.
To make the service start automatically on OS boot run enable command:
# systemctl enable emailbot
# systemctl status emailbot
● emailbot.service - EmailBot service
   Loaded: loaded (/etc/systemd/system/emailbot.service; enabled; vendor preset: enabled)
   Active: active (running) since Fri 2019-02-15 20:31:59 MSK; 23s ago
 Main PID: 2439 (run_email_bot.p)
    Tasks: 1
   Memory: 18.4M
      CPU: 305ms
   CGroup: /system.slice/emailbot.service
           └─2439 /usr/bin/python3 /home/j.smith/EmailBot/run_email_bot.py

Feb 15 20:31:59 botserver.corporation.com systemd[1]: emailbot.service: Service hold-off time over, scheduling restart.
Feb 15 20:31:59 botserver.corporation.com systemd[1]: Stopped EmailBot service.
Feb 15 20:31:59 botserver.corporation.com systemd[1]: Started EmailBot service.
Hi! My name is Alexander and I am a Vulnerability Management specialist. You can read more about me here. Currently, the best way to follow me is my Telegram channel @avleonovcom. I update it more often than this site. If you haven’t used Telegram yet, give it a try. It’s great. You can discuss my posts or ask questions at @avleonovchat.
А всех русскоязычных я приглашаю в ещё один телеграмм канал @avleonovrus, первым делом теперь пишу туда.
nice imformation’