Tag Archives: VirtualBox

Installing OpenVAS 9 from the sources

upd. 29.09.2018 Unfortunately, the script does not work after Greenbone moved the sources from their internal repository to GitHub. It’s necessary to edit the script. Stay tuned.

In last month Greenbone Networks and OpenVAS development team have finally presented new OpenVAS 9 with new GUI, improved multi-scanner support, improved asset management, etc. We have been waiting for this release for 2 years!

Upd. Please note, that entire procedure for separating scanners onto separate hardware/distributed hardware in different datacenters has changed completely – and that it’s a good idea to get familiar with this new procedure prior to upgrading to OpenVAS 9. 😉

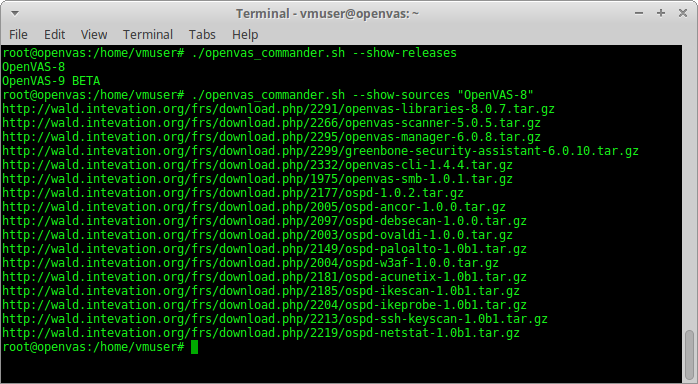
For installing OpenVAS 9 from the sources I used the same script as for OpenVAS 8 installation last year. More details about this script and why you may need it you can read in the post “openvas_commander for OpenVAS installation and management“.

OpenVAS 9 Dashboards

I fixed the script a bit because of these changes in OpenVAS9:

  • openvas-nvt-syncwas renamed to greenbone-nvt-sync
  • openvas-mkcert and openvas-mkcert-client were replaced by openvas-manage-certs

Continue reading

Installing Nessus for SecurityCenter on laptop

The great thing about Tenable SecurityCenter: when you buy it you also get hundreds of licenses for Nessus.  You can google different types of SecurityCenter bundles with “SecurityCenter Continuous View – On Premise” request. “Scanners” here mean SC scanners:

You will need these scanner licenses to deploy Nessus hosts on your network, connect them to your Tenable SecurityCenter and manage scan process using SecurityCenter via graphical user interface or API. Of course, with all the restrictions on amount of IP addresses that you can scan.

At the same time, these Nessus for SecurityCenter servers are fully functional. Technically this servers are the same as Nessus Professional. Nessus for SecurityCenter has the same web interface, where you can create multiple user accounts, manage the scans in GUI and API, scan any amount of IP addresses. Scan data will be stored locally on your Nessus server and your SecurityCenter will not see it or use it in any way. This is really great. And I hope it is a feature and not a bug.

However, there are some differences. Nessus Professional downloads security plugins and makes activation using remote Tenable severs. Nessus for SecurityCenter does these things using SecurityCenter in your network.

So, when you have such a great amount of Nessus licenses you may want to install one on your own laptop. It might be really useful for debugging. For example, when you are developing your own nasl scripts, to enable them in Nessus, you will need to restart it. And you will not probably want to do it on the Nessus server where dozens of scanning jobs are running.

In this post I will try to install Nessus on Centos 7 in VirtualBox, configure port forwarding, activate and update Nessus plugins with SecurityCenter.

Continue reading

Using Qualys Virtual Scanner Appliance

In a previous post about Qualys VM I mentioned Qualys Scanner Appliances, which you can use to scan hosts inside your network. Let’s see how to configure and use them.

Qualys Virtual Scanner Appliance

To add new Appliance go to https://qualysguard.qualys.eu/fo/tools/scannerAppliances.php and press “New”. You can choose a Scanner Appliance (Hardware) or Virtual Scanner Appliance. For testing I would like to have an appliance in form of VirtualBox virtual machine, so I choose “Virtual Scanner Appliance”.

Setup wizard appeared:

Qualys virtual appliance wizard

I clicked on Download Image Only.

Qualys Virtual Scanner Appliance supports variety of virtualization platforms:

  • Standard (OVA)
  • OpenStack
  • VMware vApp
  • Microsoft Hyper-V
  • Amazon HVM Machine Image (Pre-Authorized Scanning)
  • Amazon HVM Machine Image
  • Microsoft Azure Marketplace Image
  • Google Compute Cloud Image

I choose standard distribution package for this target platforms:

  • VMware vSphere: vCenter Server, ESXi
  • VMware Workstation, Player, Workstation Player, Fusion
  • Oracle VM VirtualBox
  • Citrix XenServer

Continue reading

openvas_commander for OpenVAS installation and management

upd. 29.09.2018 Unfortunately, the script does not work after Greenbone moved the sources from their internal repository to GitHub. It’s necessary to edit the script. Stay tuned.

If you will search articles about OpenVAS most of them will be about installation: installation in Kali (in 3 lines) and various bash scripts for installing it from the sources.

OpenVAS commander

Pros of using installation the sources:

  • It is the the fastest way to obtain current stable and beta version OpenVAS for every day use and testing.
  • Security reasons. As soon as there are no official OpenVAS packages you need to rely on some individuals who provide packages for popular distributions and in some cases it is not the option.
  • Some scripting for updating OpenVAS database and managing OpenVAS services will be required anyway. Starting the OpenVAS is still a quest: you need to check the statuses of database, start the services in a right order.
  • This is the first step towards the full automation of OpenVAS scanning and testing.

Cons:

  • You will need to install lot’s of additional packages to build OpenVAS binaries. More than 2Gb of files should be downloaded. It may take hours to install configure all this packages on a slow machine (especially all those TeX packages).
  • Building all packages also takes time. It takes as much time as knowledge base update.

I wrote a small bash script to simplify OpenVAS installation and management of  – openvas_commander.sh. Tested on Debian 8.5, should work on Ubuntu and Kali.

Upd 10.04.2017 Read how to use this script to install OpenVAS 9 on Debian in the post “Installing OpenVAS 9 from the sources“.

wget https://raw.githubusercontent.com/leonov-av/openvas-commander/master/openvas_commander.sh
chmod +x openvas_commander.sh

What are its advantages over other similar scripts?

Continue reading

Testing Rapid7 Nexpose CE vulnerability scanner

Today I want to write about another great vulnerability management solution – Nexpose Community Edition by Rapid7. What makes it special? Nexpose CE is a fully functional network vulnerability scanner that can be used for free not only by home users (Nessus Home, for example, has such restrictions), but also by the companies.

Nexpose Community Edition by Rapid7

However, the company should be quite small. By using Nexpose Community Edition you have a permission to scan only 32 ip addresses. But it could be any kind of host: Linux and Windows, Unix and network equipment. And you can scan it as often as you like, with different profiles and produce wide range of reports.

Continue reading